
5 DIY Chandelier Ideas: Beads, Candles, Mason Jars, Test Tubes, Clothespins
Five inexpensive DIY chandelier ideas—beaded, candle, mason jar, chemistry test-tube, and clothespin—with practical build and safety notes.
A chandelier does not have to arrive in a box from a lighting showroom. DIY versions—beaded, candle-style, mason jar, test-tube, and clothespin—can hang as real fixtures or as decorative light sculptures, depending on your comfort with electrical work. The five ideas below stay inexpensive, visually clear, and flexible for dining rooms, porches, bedrooms, and studio corners.
Safety first: anything wired into household current should follow local codes, use UL-listed parts where required, and ideally involve a qualified electrician if you are unsure. Battery candles, plug-in pendant cords rated for the job, and low-voltage LED strings are friendlier starting points for first-time makers.
1. Beaded chandeliers
Beaded chandeliers catch light the way jewelry does. Glass, acrylic, wood, or clay beads strung on wire or fishing line create cascades, tiers, or a single glowing skirt around a bulb. The look ranges from glamorous to bohemian depending on bead size and color discipline.
Start with a sturdy hoop, embroidery ring, or salvaged lamp frame as the armature. Space vertical strands evenly so the silhouette reads as a chandelier, not a curtain. Heavier beads belong higher or on stronger wire; tiny seed beads work as fringe. If you include a live bulb, keep flammable thread and plastic beads away from hot incandescent glass—LED bulbs run cooler and are the practical default.
Color strategy matters more than quantity. One metal tone plus clear beads feels elegant. Mixed brights feel festive. Ombre strands from dark to light draw the eye downward and photograph well. Before hanging, weigh the finished piece; ceiling hooks and anchors must match the load, especially in plaster.
A beaded build is forgiving: you can restring a sparse section without starting over. Work over a tray so spilled beads do not vanish into the floorboards. Budget time for repetition—beading is meditative until the third hour, then it is a podcast project.
2. Candle chandeliers
Candle chandeliers lean romantic and old-world: arms or a ring holding pillar candles, tapers, or LED candles that flicker without wax drip. Painted versions of thrifted metal chandeliers often appear in DIY galleries—strip the wiring if it is unsafe, clean the arms, and refinish in a soft white, black, or chalky color so the candles become the highlight.
Real flame needs clearance from ceilings, curtains, and beaded add-ons. Never leave burning candles unattended. Drip trays or glass cups protect floors and table linens. For apartments and rental dining rooms, warm-white LED taper candles give the same silhouette with less risk and no soot on the finish you just painted.
If you keep original electrical sockets, convert to candle sleeves only if the wiring is sound and the bulbs are meant for enclosed or semi-exposed use. Many makers skip sockets entirely and treat the frame as a hanging candelabra. Either path can look intentional; mixed half-wired disasters do not.
Scale the piece to the room. A wide farmhouse table can take a broad ring; a small breakfast nook needs a tighter diameter so heads do not meet candle arms. Hang high enough for standing guests, low enough to feel intimate when seated—classic dining guidance still applies to DIY.
3. Mason jar chandeliers
Mason jar chandeliers are the crowd-pleaser of DIY lighting: clear jars as shades, clustered on a board, wheel, or metal ring, each with a pendant bulb or fairy lights inside. Farmhouse, cabin, and patio spaces take to them naturally because the jars already feel domestic and familiar.
Use jars rated for the heat you will produce. LED bulbs again reduce risk. Lid rings can be drilled for cord grips; strain relief matters so the weight of the jar does not tug on wire nuts. Balance the cluster—odd numbers often look better than even—and keep jar heights varied only if you plan the rhythm on purpose.
Frosted spray on the inside of jars softens glare. Clear jars show filament LEDs as a design feature. Add a wash of paint on the mounting board if the wood tone fights the room. Outdoor versions need weather-rated cords, covered outlets, and a plan for wind; jars become kinetic hazards in a gust.
This project teaches basic pendant layout. Sketch the footprint on paper before drilling the canopy or board. Dry-fit cords at equal lengths, then adjust. A mason jar chandelier that hangs crooked will annoy you longer than the afternoon it took to build.
4. Chemistry test-tube chandelier
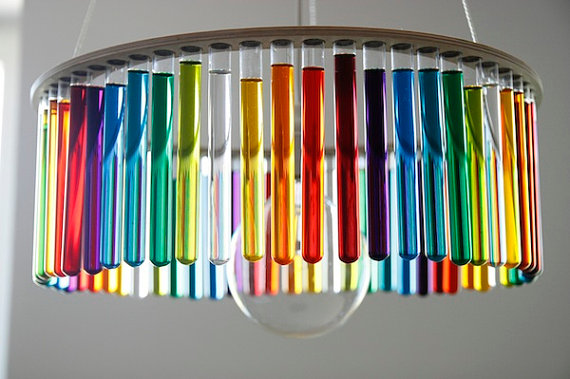
A test-tube chandelier turns laboratory glass into a light sculpture. Tubes hang in grids or radial arrays, sometimes holding water and flowers, sometimes tiny lights, sometimes both in separate tubes. The recycled, science-lab aesthetic suits studios, lofts, and anyone who wants a chandelier that does not look like a catalog crystal clone.
Mounting is the hard part. Tubes need secure clips, drilled wood blocks, or wire cradles that will not crack thin glass. Leave expansion room if you add water; temperature changes and overfilling cause messes. Keep electrical components out of wet tubes—use separate dry tubes for LEDs or hang lights above an all-floral array.
Visual rhythm comes from repetition. Identical tube lengths read as modern; mixed lengths feel more organic. Clear glass plus green stems is the classic look. Empty tubes with micro lights feel more nocturnal and party-ready. Clean laboratory residue thoroughly before hanging anything over a dining table.
Treat glass as breakable cargo during install. Work with a partner when lifting the finished rack. Anchors must handle dynamic load if tubes can swing. Once hung, the piece rewards slow looking: light refracts through cylinders in a way fabric shades never will.
5. Clothespin chandelier
Clothespin chandeliers sound like a craft-drawer joke until you see a finished sphere or cascade of wooden pins radiating from a central bulb. Natural wood pins look Scandinavian; painted pins look pop. The material is cheap, replaceable, and oddly architectural when repeated at scale.
Common builds attach pins to a wire lampshade frame, foam sphere (decorative only, keep foam away from heat), or metal hoop. Hot glue works for lightweight display pieces; mechanical attachment—wire, small screws into a wood core—lasts longer for anything that will be bumped. Again, prefer LED bulbs and maintain air gap around the light source.
Pattern options: all pins facing one direction for a shaggy texture; alternating for denser coverage; dyed ombre for a gradient. Leave some gaps so light escapes; a solid wooden shell will look heavy and dark. Test the glow in the evening before declaring the project done—daytime craft light lies.
This is a strong kids-help-with-prep project if adults handle wiring and hanging. Sorting pins, painting batches, and clipping dry pins onto a frame are repetitive tasks that still produce a dramatic after photo.
Picking an idea that fits your room
Choose beads when you want sparkle and soft movement. Choose candles when you want atmosphere over task light. Choose mason jars when you want approachable farmhouse glow. Choose test tubes when you want a conversation piece with refracted light. Choose clothespins when you want a low-cost sculptural statement built from everyday hardware.
Measure ceiling height, table width, and walking paths before you commit to diameter. Plan the canopy or hook, the cord length, and how you will clean the piece—dust loves horizontal beads and jar lids. Inexpensive does not mean careless: balanced hanging, listed electrical parts, and fire-aware material choices are what separate a charming DIY chandelier from a weekend regret.
Hang one well-made piece rather than five half-finished experiments. The room will tell you quickly whether the light feels welcoming. When it does, you will stop noticing the materials and start noticing the evening—which is the whole point of a chandelier, store-bought or not.

Comments
Continue reading

Simple, Cute Valentine Gift Wrapping Ideas
A craft guide to personalized Valentine wraps—kraft bases, paper hearts, ribbon, tags, and texture mixes—using inexpensive supplies and the gallery examples as patterns.
DIY Spring and Easter Napkin Rings for the Holiday Table
Make Easter and spring napkin rings—nest, knit flower, bunny, scrap-flower, and edible styles—with sizing, food-safety, and batch tips for a calm tablescape.

20 DIY Shoe Makeover Ideas: Paint, Glitter, Clips, and More
Twenty shoe upgrades—floral boots, glitter wedges, neon soles, crystal pumps, lace overlays, and novelty heels—with practical steps for each.