
5 Simple DIY Skirt Tutorials You Can Sew This Weekend
Circle, tee-to-pencil, gathered dirndl, wrap, and print pencil—five beginner-friendly skirt projects that remake fabric you already own.
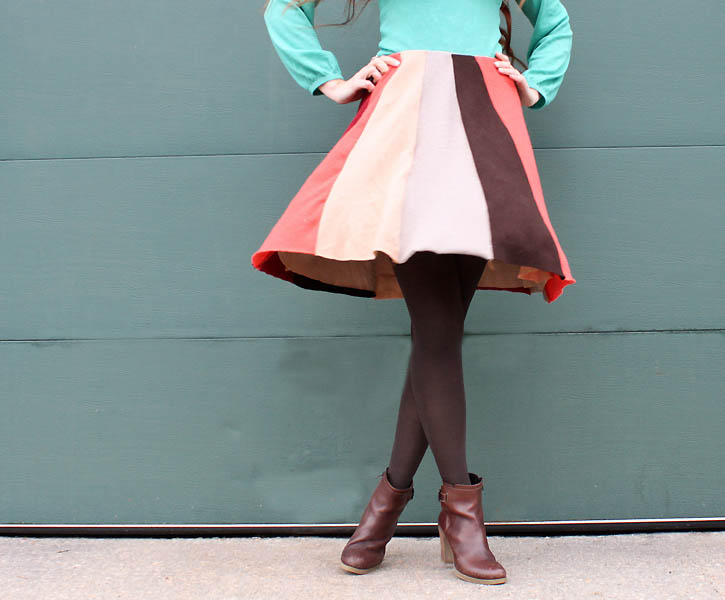
Buying a new skirt every time your wardrobe feels stale gets expensive fast. Remaking what you already own—or sewing a simple silhouette from a remnant—costs less, uses fabric that would otherwise sit unused, and lets you control length, fit, and details. These five DIY skirt projects stay beginner-friendly: clear shapes, familiar seams, and techniques you can finish in an afternoon or a weekend without advanced pattern drafting.
Keep a basic kit nearby: fabric scissors, pins or clips, measuring tape, chalk or a washable marker, a sewing machine with a zigzag or stretch stitch, and an iron. Pre-wash fabric so the finished skirt does not shrink after the first laundry day. Press as you sew; neat seams start with flat fabric, not with last-minute steam on a wrinkled hem.
1. Elastic-waist circle skirt from a remnant
A circle skirt looks dramatic and sews simply: one curved hem, one waist finish, almost no fitting drama. Start with a lightweight woven—cotton lawn, rayon challis, or soft linen blends drape without fighting you. Measure your waist where you want the skirt to sit. Decide on length from that point to the hem. On folded fabric, mark an inner quarter-circle whose radius matches your waist measurement divided by (2 × π), then mark an outer quarter-circle that adds your desired length. Cut, open the fabric into a full circle, and try the waist opening on your body before you commit to elastic.
For the waist, cut a casing strip or fold a self-fabric tunnel wide enough for ¾-inch or 1-inch elastic. Leave a small opening, thread elastic cut slightly shorter than your waist for a secure hold, overlap the elastic ends, stitch them firmly, and close the casing. Hem the circle with a narrow rolled hem, a twin-needle finish, or a simple turn-and-stitch if the fabric is stable. Because the hem is long and curved, work in small sections and ease rather than stretch. The result is a swingy skirt that pairs with tights in cool weather and sandals when it is warm—made from yardage you might have bought for something else and never used.
If your remnant is not wide enough for a full circle, sew a half-circle or three-quarter circle instead. You will lose some flare, but the method stays the same and still reads as a handmade skirt rather than a rushed craft project.
2. T-shirt into a soft jersey pencil skirt
An oversized tee with a clean print or solid color can become a pull-on pencil skirt with almost no waste. Lay the shirt flat. Cut off the sleeves and neckline so you have a tube of body fabric. Measure your hips and waist; the tube should fit the larger of those measurements with enough stretch to pull on. If the shirt is too wide, sew a new side seam (or two) to slim it. If it is too long, trim from the hem upward to your preferred skirt length plus a hem allowance.
Stabilize the waist with clear elastic or a folded knit waistband cut from the leftover hem or sleeve fabric. Knit fabrics like a zigzag, lightning, or stretch stitch so seams can move with you. Avoid a tight straight stitch that will pop when you sit. A walking foot helps if the jersey crawls. Finish the hem with a twin needle, cover stitch if you have one, or a gentle zigzag folded once.
Style tip: leave a small slit at the back hem if the pencil shape feels restrictive when walking. One vertical seam opening, reinforced at the top with a bar tack or small triangle of stitching, keeps the silhouette sleek without hobbling your stride. This project is ideal when you want a new skirt tonight and the “fabric store” is your dresser drawer.
3. Gathered dirndl skirt from a rectangular panel
If curves intimidate you, sew a rectangle. A dirndl-style skirt is a wide panel (or several panels seamed together) gathered into a waistband. Width is roughly 1.5 to 2.5 times your waist, depending on how full you want the gathers. Length is waist-to-hem plus seam and hem allowances. Medium-weight cotton, chambray, or quilting cotton works well and presses cleanly.
Sew the side seam into a tube, leaving a gap only if you plan a side zipper—many beginners skip the zipper and use an elastic or drawstring waist instead. Run two parallel rows of long basting stitches along the top edge, then pull the bobbin threads to gather evenly until the top matches your waistband length. Pin gathers with the densest folds distributed evenly; denser gathers at the sides and sparser at center front/back can flatter, but even distribution is safest for a first try.
Attach a waistband: either a flat band with a button and short placket, or a soft elastic casing. Press the seam upward into the band, topstitch if you like a crisp look, and hem the bottom with a double fold. Add in-seam pockets before gathering if you want them—cut simple patch or inseam pocket bags from the same fabric and sew them into the side seams. A gathered skirt forgives imperfect cutting and still looks intentional when the gathers are even and the hem is level. Hang the skirt overnight before hemming if the fabric relaxes, then even up the lower edge.
4. Wrap skirt with ties for adjustable fit
Wrap skirts solve the “will this fit after lunch?” problem. You cut a wide rectangle or a gently flared panel long enough to wrap past your side seam, then add waist ties. No zipper, no elastic stretch math—just overlap and knot. Use a fabric with a nice face on both sides if the wrap will flip, or line a lighter cloth for opacity.
Measure your waist and add enough overlap so the skirt does not gape when you walk (often an extra half to three-quarters of your waist circumference in total wrap length, depending on design). Height is your preferred skirt length plus hem. Finish the vertical edges with a clean turn, bias binding, or French seams if the fabric frays. At the waist, attach long ties cut on the straight grain or use grosgrain ribbon for strength. Reinforce the stress points where ties meet the skirt body with a small box of stitching.
Wear-test the wrap before final hemming. Sit, climb stairs, and check wind behavior outdoors. If the front panel lifts, add a discreet inner button or snap at the underlap. Wrap skirts shine for travel and fluctuating sizes; one well-made wrap can cover several body days in a week. Choose prints carefully: large motifs look bold on a wrap’s diagonal closing line, while small prints read quieter and more polished.
5. Polka-dot (or any print) no-pattern pencil skirt
A fitted pencil skirt does not require a commercial pattern if you use a skirt you already like as a template—or draft a simple block from measurements. For a fast version, fold a stretch woven or stable ponte in half, place an existing skirt on top as a guide, and cut around it with seam allowance. For woven non-stretch fabric, add a back darts-and-zipper plan: two darts shaping the waist to hip, a centered zipper, and a back vent or slit.
Mark waist, hip, and hem lines while the pieces are flat. Sew darts toward the points, press toward center. Insert the zipper before the waistband so you can adjust ease. A simple faced waist or a narrow contoured band finishes the top; understitch facing so it stays inside. Hem with a blind stitch by hand for a clean RTW look, or machine stitch close to the fold if you prefer speed.
Polka dots and other allover prints hide small seam wobbles better than solid dark fabrics, which is why quick pencil-skirt makeovers often use playful prints. Match dots across the side seams if you want a sharper result; if the print is busy, prioritize grainline and fit over perfect motif matching. Press every seam. A pencil skirt’s entire personality is in clean vertical lines—rushing the iron shows.
If you are truly short on time, a stretch pencil skirt with an elastic waist and no zipper can be cut from a single tube of ponte, similar to the tee method but with fashion fabric instead of a graphic shirt. Fit is less couture, but the silhouette still reads as a polished handmade piece when length and hem are deliberate.
Finishing habits that make DIY skirts look bought
Clip threads as you go. Grade seam allowances at thick points. Use a seam ripper without anger—fixing a three-inch mistake beats wearing a twist forever. Label leftovers with fiber content so the next project starts faster. When you photograph your finished skirt, natural light and a simple top show the sewing better than cluttered backgrounds.
These five approaches—circle remnant, tee-to-pencil, gathered rectangle, wrap with ties, and print pencil—cover most beginner goals: flare, stretch comfort, fullness, adjustable fit, and a tailored line. Pick one silhouette that matches a gap in your closet, use fabric you already like touching, and sew the seams you understand before you invent new ones. A wardrobe refresh does not require a shopping trip; sometimes it only requires an afternoon, an iron, and the nerve to cut.

Comments
Continue reading
Bird Feeder Ideas for Gardens, Balconies, and Outdoor Décor
Stylish bird feeder ideas with practical placement, seed tips, cleaning habits, and design notes so outdoor décor also feeds wildlife well.
20 Easy Hairstyle Tutorials You Can Do at Home
Twenty easy styles—fishtails, twisted ponies, bow buns, victory waves, side braids, and sleek updos—with clear mirror-friendly steps for each.

How to Wear a Blazer with a Mini Skirt
Proportion, fabric, color, and shoes—practical styling criteria for pairing a blazer with a mini skirt from day looks to evening without looking unfinished.