
Chair to Bench DIY: How to Turn Old Chairs into Real Seating
Choose matching frames, bridge them with a solid seat subframe, finish for indoor or outdoor use, and build a bench that actually holds weight.
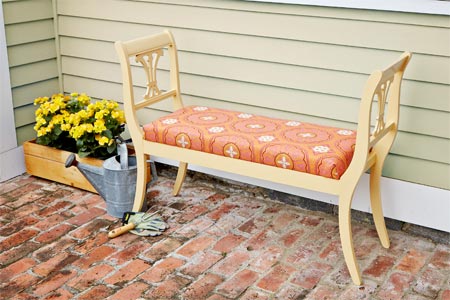
Mismatched dining chairs are a common household leftover: sturdy enough to keep, awkward enough that nobody wants a full set again. One of the most satisfying ways to give them a second life is to turn two or three into a single bench. The idea is simple—share one long seat across two chair frames—but the build rewards care. Seat height, back angle, and joinery all have to agree, or the piece will wobble, creak, or look like a compromise instead of furniture.
This guide walks through the logic of chair-to-bench projects: how to choose frames, how to bridge them, how to finish for indoor or outdoor use, and how to adapt the same idea into corner or multi-chair versions. The goal is a bench you will actually sit on, not a Pinterest prop that fails the first guest.
Start with the right chairs
Two chairs do not need to be identical twins, but they should share critical dimensions. Seat height within about half an inch of each other keeps the finished surface honest. Back height and rake should be close enough that a continuous seat and optional back rail look intentional. Wood frames with removable seats are the friendliest: flip the chair, remove screws from underneath, and set the cushions aside. Metal frames can work, but fastening lumber to them often needs different hardware and more improvisation.
Inspect joints before you invest finish time. A chair that rocks when you press the arms will rock twice as hard as half a bench. Tighten loose stretchers, regluing where needed, and reject frames with cracked legs or broken tenons. Upcycling is not the same as resurrecting scrap that has already failed structurally.
Decide early whether the bench is indoor dining, entry seating, porch furniture, or garden seating. That choice drives fasteners (interior vs exterior screws), adhesives, paint systems, and whether you need drainage or weather-rated plywood. Outdoor benches also benefit from slightly wider gaps or finishes that tolerate moisture movement.
Core build: two chairs, one seat
The classic method keeps both chair backs as the ends of the bench and replaces the individual seats with one spanning panel. After seats are removed, set the frames side by side on a flat floor and decide the gap between them. Touching side rails make a shorter, denser bench; a small gap lengthens the seat and can look more generous, but then you must bridge that gap with a strong subframe so the middle does not flex.
Many builders add a rectangular seat frame of 1×3 or 1×4 stock that ties into the old seat rails or into the chair backs where the seat once fastened. Corner braces or L-brackets help hold that rectangle square. A center cross-support under longer spans is not optional decoration—it is how you stop the plywood or slats from bouncing when someone sits in the middle.
For the top, ¾-inch plywood is a common, stable choice. Measure the overall length from outer edge to outer edge, then decide on a slight overhang if you want a finished look. Round front corners with a jigsaw if the chairs have curved lines; sharp corners on a rustic frame can look accidental. Some makers prefer individual slats for a farmhouse feel and better outdoor drying. Slats need even spacing and solid attachment to the subframe so they do not cup independently.
If chair backs are curved, a flat plywood seat may need notching or careful fitting so it settles against the back posts without rocking. A poster-board template helps: cut, test, adjust, then transfer to wood. Glue plus screws from below—using original seat-screw holes when they still align—keeps the top quiet and secure. Pilot holes matter; splitting an old chair rail ruins the project late in the game.
Structural details that separate success from regret
Benches fail at connections. Whenever you introduce new lumber between old frames, think in triangles and continuous load paths. Screws alone into end grain are weak; prefer screws into solid rail faces, glue at mating surfaces, and metal braces where wood meets wood at right angles. On outdoor builds, use exterior-rated screws and consider zinc-plated or stainless hardware so rust does not stain the finish.
Keep the assembly flat while fastening. Clamp frames to a known-level surface before you lock the subframe. If one chair leans, the bench will forever announce that lean. A rubber mallet and patience beat forcing a misaligned rail with longer screws.
Optional back rails can unify mismatched chair backs. Horizontal boards screwed across the rear posts create a shared backrest and visually merge the two chairs into one object. Cut chair backs down only if you truly want a lower profile; once cut, you cannot restore the original silhouette, so mock the height with tape first.
Upholstery is a second project layered on the first. A foam-and-fabric cushion sized to the new top can hide imperfect plywood edges and make dining use comfortable. For outdoor benches, choose outdoor foam and fabric, or skip soft seating and rely on a well-finished wood top.
Finish like furniture, not like scrap
Strip or sand enough that paint or stain grips. Old dining chairs often carry grease, wax, or glossy varnish that fights new coatings. Clean with a degreaser appropriate to the finish you plan, sand to scuff the surface, and wipe dust thoroughly. Deep colors may need a tinted primer coat for even coverage.
Paint can hide mismatched wood species and repair patches; stain celebrates grain when both chairs are similar hardwoods. Either way, coat the new seat and the old frames as one system so the bench does not look like two painted chairs with a raw board dropped on top. For porch use, exterior enamel or spar varnish lasts longer than indoor craft paint.
A light glaze or wash after base color can age a piece deliberately, but apply restraint. Heavy “distressing” often reads as costume. Wear that develops from real sitting will look better than fake scrapes in all the wrong places.
Variations worth knowing
Corner benches use three or four chairs arranged at a right angle, often for breakfast nooks. Geometry gets harder: inside corner seats need careful miters or a custom L-shaped top, and the connection between runs must stay rigid. Measure twice, build a dry mockup with clamps, and only then commit to permanent fasteners.
Three-chair linear benches create longer seating for mudrooms or garden paths. The middle chair may lose its individuality—sometimes builders remove the middle back or integrate it into a continuous rail. Longer spans demand more cross-supports and thicker seat stock.
Some tutorials remove front legs from chairs and rebuild a shared front apron; others keep all legs and rely on the subframe alone. Keeping all legs usually preserves strength if the floor is flat. Removing legs can clean up a silhouette but shifts more load into your new joinery, so only do it when you understand the new frame.
Tools and a realistic afternoon plan
Minimum kit: screwdriver or drill, measuring tape, square, saw for seat material, sandpaper, clamps, wood glue, and appropriate screws. A jigsaw helps with curves; a miter saw speeds clean crosscuts; a countersink bit keeps screw heads neat. Hardware-store panel cutting can save time if you bring exact dimensions.
Plan the day in phases rather than rushing to paint. Morning: disassemble seats, repair frames, cut and dry-fit the subframe and top. Afternoon: fasten structure, fill holes, sand. Next day: finish coats. Rushing finish onto a still-flexing frame is how projects look unfinished forever.
Safety is ordinary but non-negotiable: eye protection when cutting, ventilation for finishes, and help lifting awkward assemblies. Old chairs can hide staples and brittle joints; go slowly when prying.
Checklist before you call it done
- Both frames sit flat with no rock when pressed at opposite corners.
- Seat does not bounce noticeably in the center under adult weight.
- All new fasteners are tight; no screw tips poke through where legs or hands rest.
- Finish covers end grain of the new seat and any cut chair parts.
- If outdoors, water can shed and metal hardware is exterior-rated.
If a step fails the checklist, fix structure before buying nicer fabric. A beautiful cushion on a soft middle is still a failed bench.
When the last coat cures, put the bench where people naturally pause—by the table, inside the door, on the porch—and live with it for a week. Listen for creaks, watch for finish wear, and tighten anything that settles. The best chair-to-bench projects earn their keep quietly: two leftovers, one useful seat, and a scrap pile that got smaller instead of larger.

Comments
Continue reading

Pool Noodle DIY Ideas Kids Actually Use
Turn leftover foam noodles into rockets, counters, bed bumpers, soft swords, and outdoor course markers—with safety notes and a short project checklist.

32 Ways to Repurpose Old Sweaters Into Wearables and Home Goods
From knotted headbands and coffee sleeves to stockings, skirts, softies, and wine bags—thirty-two projects that give stretched-out knits a second life.
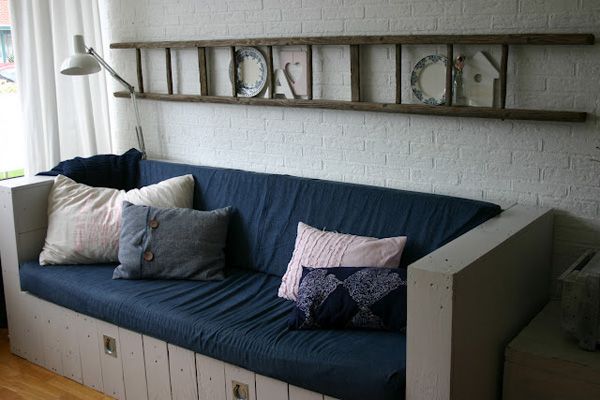
40 Impressive Ways to Repurpose Everyday Objects at Home
A gallery of DIY home repurposing ideas—from ladder shelves and salvage furniture to garden fountains, wine racks, and wall art—with practical notes on making each project sturdy and useful.