
Pine Cone Crafts for Kids: Wreaths, Animals, and Table Décor
Dry, sort, and craft pine cones into wreaths, garlands, owls, turkeys, and centerpieces—with kid safety notes for glue, glitter, and candles.
Winter shortens outdoor play and stretches indoor hours with kids. Pine cones are one of the easiest natural materials to turn into crafts: free or cheap, sturdy enough for little hands, and already shaped like animals, trees, and ornaments. Collect them on a walk, dry them fully, then set out felt, twigs, glue, and paint for an afternoon of making. If you live somewhere without pines, craft stores and garden centers sell cleaned cones in bags—still useful, just skip the forage.
Before any project, shake cones outdoors, check for debris, and bake or air-dry them so they open and insects do not hitch a ride indoors. Keep hot glue guns, sharp scissors, glitter, and small beads for adults or older kids. Toddlers can stick pre-cut felt shapes with white glue or glue sticks while someone else handles heat and glitter cleanup.
Prep, drying, and kid safety
Fresh cones can be closed and sticky with sap. Spread them on newspaper for a few days, or place them on a foil-lined tray in a low oven (around 200°F / 95°C) for 30–45 minutes, watching closely so nothing scorches. Cooling cones open into the classic layered shape. Sap softens with warmth—wipe sticky spots with a little oil on a cloth, then wash hands. Never leave an oven unattended with kids in the kitchen.
Safety notes that matter for family craft time:
- Hot glue burns—adults apply glue; kids press pieces after a short cool-down.
- Glitter and fine flocking are messy and easy to rub into eyes; use trays and consider chunky glitter or paint instead for young children.
- Small parts (pearls, beads, googly eyes) are choking hazards under age three.
- Candle projects need adult supervision; prefer battery tealights inside pine cone surrounds.
- Outdoor foraging: stay on public paths, leave protected areas alone, and wash hands after collecting.
Wreaths, garlands, and glitter trees
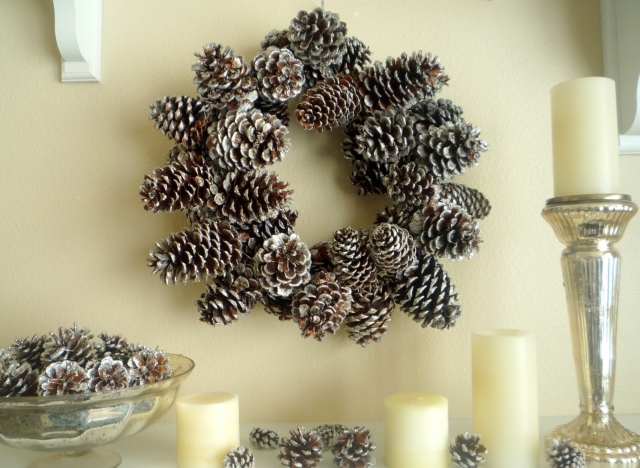
A pine cone wreath starts with a wire or grapevine ring. Wrap cones tightly with floral wire through the bottom scales, overlapping as you go so gaps disappear. Mix sizes for depth. A light dusting of glitter or a dry brush of white paint gives a frosted look without soaking the cone. Hang with a wide ribbon so the weight sits evenly. Kids can sort cones by size and hand them over; wiring is an adult job.
Garlands are simpler: tie cones at intervals along jute twine or thin ribbon, knotting above the stem so they hang point-down or sideways. Space them for mantels, stair rails, or window frames. Alternate plain cones with painted tips. For a tabletop “tree,” stack graduated cones on a dowel set in a small wood base, or glue cones to a foam cone form covered in brown paper. Glittery versions photograph well; seal loose glitter outdoors with a clear spray if you must, and keep sealed pieces away from food until fully dry.
Animals kids recognize: owls, turkeys, and birds
Pine cones already look like feathered bodies. For an owl, glue large felt circles for eyes, a triangle beak, and wing shapes to the sides; a bit of yarn or a twig feet base helps it stand. Turkeys use the cone as the body, with colorful paper or felt feathers fanned behind and a small head on a stick or pipe cleaner at the front. These are classic Thanksgiving table crafts: each child can customize feather colors while adults stabilize the base so the bird does not tip into the gravy.
Other easy creatures: hedgehogs with clay or pom-pom noses and bead eyes (skip beads for toddlers), mice with felt ears and yarn tails, or birds perched on a twig glued into a cork base. Keep scale consistent—one cone per animal—so a group looks intentional on a shelf. Use washable school glue when possible; reserve hot glue for attaching heavy twigs or when white glue will not hold.
Centerpieces, place cards, and votive ideas
For a dinner table, cluster three to five cones in a shallow bowl with moss, nuts, or cinnamon sticks. Add name tags tucked into the scales for place cards—print names on kraft paper and clip with a mini clothespin. A “turkey centerpiece” can sit in the middle of a kids’ table where breakage matters less than at the adult table.
Votive surrounds look festive: arrange cones in a ring around a glass cup that holds a battery candle. Do not nest real flames against dry pine scales—cones are flammable. If you want the glow of a candle, keep glass between flame and craft, or switch to LEDs. Pearl or bead accents glued into open scales suit winter holiday décor; again, keep tiny pieces away from mouths and floors where babies crawl.
Paint, felt, burlap, and leftover scraps
Paint tips white or gold for a quick upgrade. Dip only the ends so the brown body still reads as a cone. Felt scraps become scarves, wings, and hats. Burlap ribbon wraps a wreath or bows a garland. Twigs become legs and antlers. The point of seasonal pine cone crafts is improvisation with what you already have: leftover yarn, buttons from a sewing tin, scrapbook paper cut into leaves.
Work in stations if several kids share a table. Station one: painting tips on newspaper. Station two: sticking felt with glue sticks. Station three: adult hot-glue assembly. Rotate so nobody waits twenty minutes with nothing to do. Cover the table; pine cone scales shed and paint drips between layers.
Storage and display after the season
Finished crafts break if crushed in a toy bin. Nest wreaths in a box with tissue; stand animals on a high shelf; coil garlands loosely. Dust with a soft brush. If cones were not fully dried, they can close again in humidity or grow mold—air them out if they smell musty and discard any that stay damp.
A short project list for one family afternoon:
- Sort and dry a basket of cones.
- Make one shared wreath or garland for the door.
- Let each child build one animal with felt and glue.
- Finish with a bowl centerpiece for the table.
Start with clean, dry cones and an adult on glue duty; the rest is sorting, sticking, and deciding whether today’s cone wants to be an owl, a turkey, or a glittered tree for the mantel.

Comments
Continue reading
Knit Kitchen Tools You Will Actually Use
Dishcloths, pot holders, bowl cozies, and other small knits for the kitchen—yarn choices, cotton vs wool, and projects that survive heat, water, and daily mess.
Botanical Christmas Ornaments from Citrus, Herbs, and Dried Flowers
Dried orange slices, rosemary, bay, and pressed flowers as tree ornaments—how to dry, string, and store them so they last the season without going moldy.
How to Wrap Gifts Without Wrapping Paper
Cloth, boxes, maps, leftover textile, and ribbon-only wraps—practical no-paper methods that still look finished under a tree or on a doorstep.