
Easy DIY Pillow Covers for Beginners
Beginner pillow-cover methods—envelope backs, fabric choices, patchwork fronts, and finishing tips—so one sofa refresh actually gets sewn.
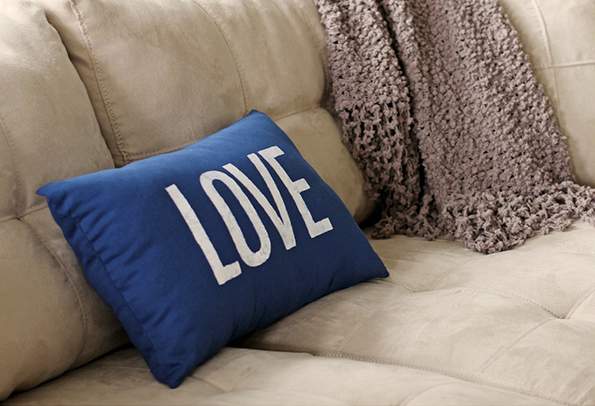
A room can feel refreshed without a paint can. Swap the pillow covers, and the sofa changes temperature: new pattern, new season, new mood. Pillow cases and throw-pillow covers are among the kindest sewing projects for beginners because the shapes are rectangles, the seams are mostly straight, and mistakes hide on the back or inside an envelope closure. You may not have sewed before; after one careful cover, fabric stops feeling mysterious. The methods below stay practical—fabric choices, closures, beginner seams, and finishing—so you can reuse leftover cloth instead of collecting unused tutorial tabs.
Measure the insert, then decide the fit
Buy or reuse a pillow insert first. Measure its width and height across the fullest part, not the flat tag size alone. For a plump look, sew the cover the same size as the insert or up to an inch smaller so the fabric fills out. For a softer, slightly understuffed look, match the insert exactly. Write the cut dimensions on paper before you touch scissors: cover size plus seam allowance on each side—usually half an inch (about 1.3 cm) is enough for beginners.
Pre-wash fabric if the cover will be washed later. Cotton can shrink; skipping this step is how a perfect first cover becomes mysteriously tight after laundry day.
Fabric that forgives beginners
Quilting cotton is steady, presses well, and shows pattern clearly. Linen blends drape nicely but fray more—finish raw edges with a zigzag or pinking shears. Upcycled shirts, leftover curtain panels, and thrifted tablecloths make excellent fronts when you cut around stains and weak seams. Avoid thick upholstery leftovers for your first cover; they fight domestic machines and blunt needles.
Pattern matching across a seam is optional advanced fun. For a first project, place a bold motif centered on the front panel and let the back be simpler. That single decision makes the pillow look intentional.
The envelope back: no zipper required
An envelope closure is the friendliest beginner method. Cut one front rectangle. Cut two back pieces that together overlap in the center by about four to six inches when finished. Hem the overlapping edges of the back pieces so they look clean. Layer front right-side-up, then backs right-side-down so the hemmed edges cross in the middle, pin the outer edges, and sew around the perimeter. Clip corners, turn right-side out through the overlap, push corners gently with a blunt tool, and press.
Slide the insert in, shake, and adjust. The overlap should hide the insert without gaping. If it gaps, you needed more overlap or a slightly smaller cover. Note it for the next one—pillow math improves fast.
Five-minute style covers and stretch shortcuts
Some quick covers use stretch fabrics or oversized rectangles folded and stitched with long straight seams. They trade tailored crispness for speed. Use them for seasonal experiments and kids’ rooms. For living-room pillows you will photograph or keep for years, spend the extra twenty minutes on squared corners and pressed seams. “Fast” is only a virtue when the result still looks finished from the doorway.
If you lack a machine, a patient hand-sewn back stitch along a short seam can finish a small lumbar cover, but machine stitching remains kinder on long pillow edges. Borrow time on a machine if you must; technique travels.
Pattern play: patchwork, plus signs, and quilted fronts
Once a plain envelope cover feels easy, decorate the front before assembly. A plus-sign or simple patchwork block sewn onto a front panel adds graphic punch with scrap squares. Keep seam allowances consistent so the block stays square. Press every seam as you go; unpressed patchwork snowballs into wavy edges.
A lightly quilted front—front fabric, thin batting, muslin, a few straight or diagonal stitch lines—adds softness and hotel-bed texture. Quilt first, then trim to final front size, then attach the envelope back. Quilting shrinks the panel slightly; trimming after stitching prevents undersized fronts.
Stencils, silhouettes, and ribbon details
Not every upgrade needs piecing. Fabric paint and a stencil can put a word, a city skyline, or a simple geometric onto a plain cover. Practice on scrap. Use textile medium if your paint requires it, and heat-set according to the product so the design survives washing. A town silhouette or single bold motif works better than a busy scene on a small throw pillow.
Ribbon, silk trim, or a narrow flange can frame a solid center. Stitch trims flat before final assembly so they do not shift. Keep embellishments away from the envelope opening where hands pull the insert in and out.
Valentine brights and seasonal swaps
Because covers are removable, seasonal sewing makes sense. A red-and-pink pair for February, lighter linens for summer, deeper patterns for fall—same inserts, different skins. Store off-season covers clean, dry, and flat or loosely rolled to avoid hard creases. Label a shelf bin by size (“18-inch inserts”) so you are not guessing in October.
If you sew pairs, cut both fronts before assembling either. Matching scale across two pillows reads as a set even when patterns differ.
Finishing details that separate homemade from hasty
Press at every stage. Trim threads as you go. Grade seam allowances at corners so bulk does not fight the turn. If a seam looks wobbly, a line of topstitching a quarter inch from the edge can stabilize and look deliberate. Check the cover on the actual sofa in daylight; colors shift under warm lamps.
For durability, reinforce the envelope hem stitching and consider a second pass on stress corners. Soft inserts are easier on seams than overstuffed foam bricks. If an insert is aggressive, size the cover with that stubbornness in mind.
A first-project checklist
Insert measured. Fabric washed and ironed. Front and back pieces cut with seam allowance. Back hems sewn. Layers pinned with overlap correct. Seam sewn, corners clipped, cover turned and pressed. Insert fitted, corners filled, threads gone. That is a complete pillow cover—no zipper kit, no specialty foot required.
Make one cover well, put it on the sofa, and live with it for a week. Notice whether you want plumper fit, softer fabric, or a calmer pattern. Let the next cover answer that note. Fresh pillows are less about craft identity and more about a room that looks cared for—one rectangle of fabric at a time.

Comments
Continue reading
Knit Kitchen Tools You Will Actually Use
Dishcloths, pot holders, bowl cozies, and other small knits for the kitchen—yarn choices, cotton vs wool, and projects that survive heat, water, and daily mess.

Botanical Christmas Ornaments from Citrus, Herbs, and Dried Flowers
Dried orange slices, rosemary, bay, and pressed flowers as tree ornaments—how to dry, string, and store them so they last the season without going moldy.

How to Wrap Gifts Without Wrapping Paper
Cloth, boxes, maps, leftover textile, and ribbon-only wraps—practical no-paper methods that still look finished under a tree or on a doorstep.