
DIY Picture Frame Tray from a Thrift-Shop Frame
Turn a thrifted picture frame into a sturdy serving tray—prep, sealed insert, handles, and load-testing for coffee or breakfast in bed.
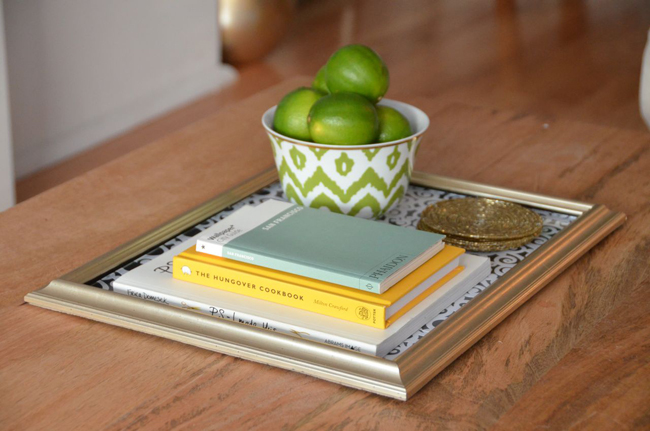
Wall space fills up fast when you love frames. Extra frames still have a job if you tip them horizontal, add a sturdy base, and treat them as trays. A thrifted picture frame becomes a coffee tray for two, a breakfast-in-bed board, or a vanity catchall—depending on size—without buying specialty serving ware. This project stays thrifty on purpose: hunt frames at thrift shops and yard sales, reuse glass or swap it for a sealed insert, and spend your effort on clean edges and handles that feel solid in the hand.
What you need
- One rigid picture frame with a flat or gently profiled face (wood is friendliest; avoid flimsy plastic)
- Backing: the original backing board, thin plywood, or foam board sealed with paper or fabric
- Optional glass or acrylic—only if you will protect the surface and accept weight
- Decorative insert: scrapbook paper, fabric, a print, or leftover wallpaper
- Strong craft glue or wood glue; optional brad nails for wood frames
- Two drawer pulls, leather straps, or rope handles with screws and washers
- Felt pads or cork dots for the underside
- Sandpaper, primer, paint or stain, and a clear sealer (water-based polyurethane or spray acrylic)
- Screwdriver, drill, ruler, pencil, scissors or craft knife, and clamps or heavy books
Size decides purpose. An 8×10 or small square frame suits mugs and a snack plate. An 11×14 or larger frame works for breakfast trays if the handles are robust and the corners stay square. Deep shadow-box frames can hold thicker inserts; shallow frames need a thin, flat stack so cups sit level.
Choose and prep the frame
At the thrift shop, press gently on the corners. If they flex or crackle, skip that frame—loose miters will fail as soon as you lift a full tray. Prefer frames with a lip deep enough to hold an insert. Remove old hardware, dusty mats, and rusty hangers. Sand rough spots and flaking finish. Wipe dust with a slightly damp cloth and let the wood dry.
Paint or stain before assembly so you do not drip onto the finished insert. A light sanding between coats keeps the rim smooth where hands grip. Seal the top edge and inner lip well; those surfaces meet cups and cleaning cloths. If you like a “found” look, distressed paint over a darker base coat can hide thrift-shop wear. Let finishes cure fully before the next steps—tacky paint grabs paper inserts and fingerprints forever.
Build a stable tray floor
Decide whether glass stays. Glass looks polished and wipes clean, but it adds weight and can shatter if the tray is dropped. Many makers remove glass and build a sealed paper or fabric surface instead. If you keep glass, clean both sides, then layer from bottom to top: backing board, decorative paper or photo facing up, glass, and the frame’s retainers or new brads. If you skip glass, glue the decorative layer to the backing, then seal that face with two or three thin coats of clear finish so spills wipe away.
Cut the insert slightly smaller than the frame’s inner opening so it drops in without buckling. Smooth wrinkles from the center outward when you glue paper or fabric. For fabric, wrap the edges around the backing board and glue on the reverse, like a tiny stretched canvas, so raw edges never show from above. Press under books while the glue sets.
Seat the finished sandwich in the frame. The goal is a flush, rattle-free floor. If the original retainers are weak, add a thin bead of wood glue along the back edge where board meets frame, or small brads from the reverse into solid wood—never through the decorative face. Clamp lightly or weight the tray overnight so nothing shifts.
Add handles you trust
Handles turn a decorated frame into a tool. Mark two points centered on the short ends for a classic tray lift, or on the long sides if the frame is wide and you prefer a sideways carry. Drill pilot holes so screws do not split old wood. Use short screws that bite into the frame without poking into the insert cavity. Washers on the inside face spread load if the wood is soft.
Drawer pulls give a furniture look. Leather straps feel soft and thrift-friendly—cut two equal lengths, punch holes, and screw through with decorative tacks or Chicago screws. Rope handles work on rustic frames; knot or clamp the ends securely and seal frayed rope with a dab of clear glue. Test with books that weigh about as much as two mugs and a plate before you trust the tray with hot drinks.
Stick felt or cork pads on the four underside corners so the tray does not scratch tables and sits level on slightly uneven surfaces.
Style and use without wrecking the finish
Match the insert to the room. Neutral kraft paper and a botanical print suit a kitchen. Bold geometric paper energizes a coffee table. A favorite photo under sealed acrylic turns the tray into a portable scrapbook page—keep food off photo surfaces unless a wipeable layer protects them. Small frames become nightstand catchalls for glasses and a book; large ones earn breakfast duty.
Wipe spills promptly. Even sealed paper hates standing liquid. Avoid soaking the tray in a sink; damp cloths are enough. Keep the tray away from open oven doors and stovetop heat that can warp glue joints. If you serve outdoors, bring it in before dew or rain softens unfinished wood on the underside.
Variations worth trying next
Mirror-tray: keep the glass, skip decorative paper, and use a thrifted framed mirror as a glam catchall—seal any raw wood edges and add padded feet. Chalkboard center: paint the insert with chalkboard paint for kids’ snack messages, then seal the frame rim so chalk dust cleans easily. Nested set: make two sizes with matching paint so the small tray parks on the large one when not in use. Holiday swap: build one sturdy frame shell and make interchangeable sealed inserts that drop in for seasons—measure carefully so swaps stay snug.
If a frame’s glass is missing and the rabbet is shallow, glue a thin plywood floor to the back of the frame instead of relying on flimsy cardboard. Sand the plywood edges, paint them to match, and you gain strength for heavier use. For a gift version, wrap finished trays in tissue with a note about weight limits and cleaning—receivers appreciate knowing it is a real serving piece, not only décor.
Quick build order
- Hunt a rigid frame; reject wobbly corners.
- Strip hardware; sand; paint or stain; seal; cure.
- Cut and glue the decorative insert; seal the top face if there is no glass.
- Assemble floor into frame; reinforce from the back.
- Drill, attach handles, add feet, and load-test.
One afternoon and a thrift-shop frame are enough for a first tray. Start with a medium size, keep the insert wipeable, and spend the careful minutes on square corners and solid handle screws. When the tray carries two mugs without a creak, the wall-space problem becomes a serving solution—and the next thrift run gets a lot more interesting.

Comments
Continue reading
Knit Kitchen Tools You Will Actually Use
Dishcloths, pot holders, bowl cozies, and other small knits for the kitchen—yarn choices, cotton vs wool, and projects that survive heat, water, and daily mess.

Botanical Christmas Ornaments from Citrus, Herbs, and Dried Flowers
Dried orange slices, rosemary, bay, and pressed flowers as tree ornaments—how to dry, string, and store them so they last the season without going moldy.

How to Wrap Gifts Without Wrapping Paper
Cloth, boxes, maps, leftover textile, and ribbon-only wraps—practical no-paper methods that still look finished under a tree or on a doorstep.